Face to Minecraft Skin: Your Face in 64×64
Face to Minecraft skin means translating a portrait into a character whose front face has only 8×8 pixels. The whole skin is a 64×64 PNG, but most of that image belongs to other head surfaces and body parts. Photo2Skin uses your picture as a reference with Classic, Cartoon, Knight or Spooky styles. A recognizable face depends on strong color groups and a few useful features rather than every detail in the photograph.
Open the photo tool with Classic style
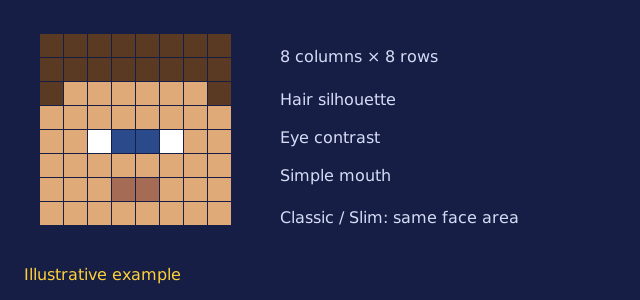
Face to Minecraft skin: understand the 8×8 tradeoff
The front of a Minecraft head has 64 pixel positions. Hair, eyes, cheeks and a mouth all share that small square. A photograph contains much more information, so fine eyelashes, pores and soft reflections cannot each have their own meaningful mark. Even a small shift in an eye or hairline can change the expression when viewed on a block head.
Think in areas instead of tiny objects. A dark band can suggest a fringe; two distinct eye marks can establish the gaze; a broad cheek color can keep the face readable. Do not judge the skin only while magnifying individual pixels. Look at the character at a normal game size, where large contrasts matter most. A simpler face can be easier for a friend to recognize across a room in a building world.
What to keep: silhouette, contrast and a signature feature
Begin with what someone would describe after a brief glance at your portrait. A dark fringe, light hair, a wide glasses frame or a clear beard shape may carry more identity than a subtle eye shade. Pick a portrait where those features are visible. A hairstyle that blends into a dark background gives a weaker reference than the same hairstyle against a pale wall.
Glasses compete with eyes for space. Thick dark frames may become a connected line, while thin frames may be less obvious. Likewise, a beard can merge with the mouth when their colors are too close. Keep expectations focused on the overall impression. If facial likeness is your priority, start with Classic and compare the result with the source picture before choosing a more dramatic style direction.
What to drop: photo noise and accidental shadows
A face photo often includes details that are lighting effects rather than lasting features. A shadow under the nose, a shiny forehead or a bright reflection on one lens can distract from the colors you want to carry into the character. Use soft light and a relaxed expression to reduce those distractions before you open the tool.
Small jewelry, decorative makeup lines and individual hair strands may disappear at this scale. Avoid relying on a tiny accessory as the only identifying feature. A strong hair shape and a consistent face palette offer a better foundation. If the photograph uses a color filter, try an unfiltered version for comparison. The goal is a face that reads clearly on the character, even when the game view makes it much smaller than your original portrait.
Prepare a portrait and check the reference boxes
Face the camera with both eyes visible and keep the forehead, chin and whole hairstyle inside the picture. Add that photo in the tool and check the selected head, face and torso areas. The face box should describe the face without taking in a large patch of shirt or background; the head box should leave room for the hair.
Use a head-and-shoulders picture rather than a crowded scene. Ask permission if the portrait belongs to another person. After choosing a style and edition, compare the main head colors and eye placement in the result. For a broader personal character workflow, read custom Minecraft skin from photo. If you want to understand the texture through drawing, see how to make a Minecraft skin of yourself.
Classic versus Slim: arm shape, not face resolution
Classic and Slim describe the arm model used when adding a skin in Minecraft. Classic arms are four pixels wide and Slim arms are three pixels wide. Both use the same 8×8 front face. Changing the arm choice cannot give the face extra room or restore details omitted from the small texture.
The tool’s Classic style is an overall appearance choice; the game’s Classic arm model is a geometry choice. Similar names can be confusing, so match the arm model to the actual texture when equipping it. If an arm edge looks wrong, examine the model selection rather than the face crop. For mobile and Windows installation, follow the Bedrock skin maker guide. Keep the PNG at its original size when adding it to either edition.
Frequently asked questions
Is the entire 64×64 image used for my face?
No. The front face uses an 8×8 area. The rest of the texture contains other head surfaces, the torso, arms, legs and layer areas.
Will Slim arms give the face more pixels?
No. Slim changes arm width from four pixels to three. The front face remains 8×8 for either arm model.
Can glasses remain recognizable on a small face?
A distinct frame can remain a useful feature, but thin lines and reflections may be simplified. Choose a photo where the glasses and eyes are clearly visible.
Why might a dramatic selfie be a weaker reference?
A strong angle hides facial features, and harsh light can change the apparent colors. A straight-on portrait with soft light provides a clearer starting point.
Does Classic style mean I must select Classic arms?
The Classic style controls the overall appearance. The Classic arm option in Minecraft controls geometry. Match the arm option to the texture rather than choosing it solely from the style name.
Return to the Photo2Skin homepage to choose your picture, or check Pricing for credit options.