How to Make a Minecraft Skin of Yourself
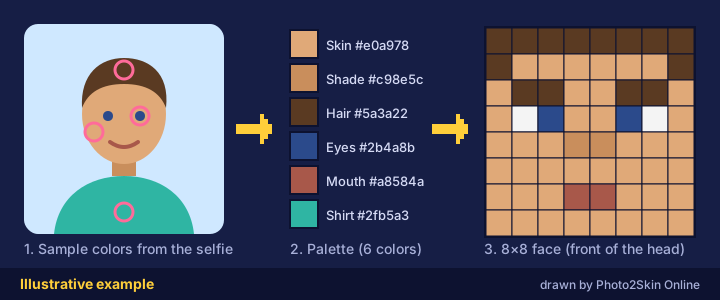
You don’t need art skills to make a Minecraft skin of yourself. A selfie to Minecraft skin project starts with a 64×64 PNG; your face takes just 8×8 pixels. Pick colors from your photo and place them on the template. This guide covers drawing by hand in a skin editor and choosing a useful reference photo.
What you need
Here is everything you need to make a Minecraft skin of yourself:
- A clear selfie. See the photo tips further down.
- A skin editor. There are several browser-based Minecraft skin editors, and the desktop app Blockbench can paint skins too. Any editor that saves a standard 64×64 PNG works.
- About 20 minutes. Your first skin takes longest; the second one goes much faster.
Step by step: draw yourself from a selfie
- Open your selfie and the editor side by side. Start from a blank template and choose the arm model: Classic (4-pixel arms) or Slim (3-pixel arms). Remember which one you picked, because you choose the same model when you install the skin.
- Build a palette with the eyedropper. Sample your skin tone from a cheek rather than a shiny spot, then your hair, eyes, shirt and trousers. If the editor has no eyedropper, any photo app can show the color code. Five to eight colors are plenty.
- Block in the base colors. Fill the head with your skin tone, the body with your shirt, the legs with your trousers and the bottom rows of the legs with your shoes. The template guides keep each color on the right part of the 64×64 file.
- Draw the 8×8 face. Eyes usually sit on the fourth row down, two pixels each with two pixels of skin between them. Put a one- or two-pixel mouth two or three rows below, and a pixel of darker skin for the nose. Fewer details read better at this size.
- Add hair and shading. Paint hair over the crown, back and sides of the head, and bring it down onto the upper rows of the face. Shade each part with one step darker on the sides and underneath and one step lighter where the light hits. Skip pure black outlines; they look heavy in game.
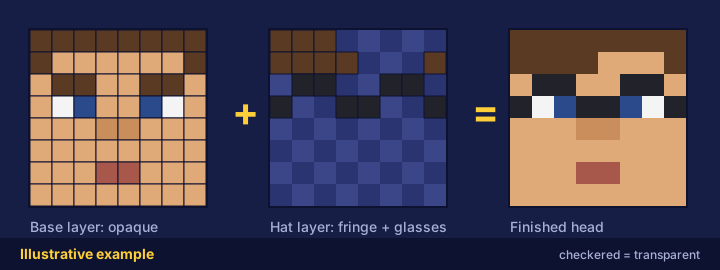
- Use the outer layer. The outer layer floats just outside the base; on the head it is called the hat layer. It is the place for a fringe, hair volume, glasses, a hood or a jacket. Leave everything else on it transparent.
- Add the small things that make it you. A collar or neckline in a slightly different shade, a watch on one wrist or sneakers in your real colors make the skin recognizable from across a server.
- Check it in 3D and save. Rotate the model, fix gaps where the sides of the head meet, then save the PNG.
How to pick a good photo
A Minecraft skin from a picture starts with a clear reference. The best photos of yourself are a little boring:
- Front-facing. Look straight at the camera so both eyes and your whole hairline are visible.
- Even light. Daylight from a window is ideal. A flash flattens your face and a lamp behind you hides it.
- Plain background. A simple wall makes the edges of your hair easy to see.
- Visible outfit colors. Your shirt and trousers are most of the skin, so wear the clothes you want and make sure they are in the shot.
- No filters. Beauty filters shift skin tone and smooth away the details you want to copy.
Quick answers
Can I make a Minecraft skin of myself without drawing skills? Yes. The face is only 8×8 pixels, so it is mostly color picking. Start with the palette, copy the face layout above and adjust until the 3D model looks like you.
Can I make a Minecraft skin from a picture of someone else? Only with their permission. Ask first, and never use photos of strangers.
Install your new skin
When the PNG is ready, follow the steps in how to change your Minecraft skin for Java and Bedrock to see yourself in game. Pick the same arm model you drew with.
Selfie to Minecraft Skin in 3 Steps
For “turn my photo into a Minecraft character,” start with a reference photo and a style. Photo2Skin Online keeps these choices together:
- Choose a photo. Open the photo to Minecraft skin uploader and select a selfie. It stays on your device.
- Pick a style. Choose Classic, Cartoon, Knight or Spooky.
- View your choices. Select Java or Bedrock, then press “Continue with this photo” to see your reference and style alongside skin tips.
Use your selected photo and style as a reference for the drawing steps above. Save the finished texture as a 64×64 PNG, then follow the installation guide for your edition.